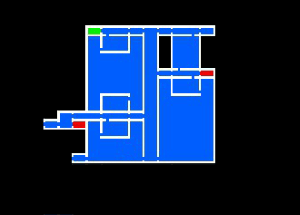
Towers of Twin Dragons is a Location in Bloodstained: Ritual of the Night. Please see Walkthrough for other areas. Tower of Twin Dragons is a tall Tower where gears and mechanisms extend beyond its walls.

General Information
- Previous: Garden of Silence (Revisited)
- Next: Livre Ex Machina
- Bosses: None
Video Walkthrough
Map

NPCs in the area
Bosses
- None
Items
Materials & Consumables
Equipment & Upgrades
- 1x Partisan
- 1x Hyperventilator
- 1x Hair Apparent VI
- 1x MP Max Up (Upgrade)
- 1x Power Slash (Skill/Ability)
Key Items
- None
Enemies
Towers of Twin Dragons Walkthrough
Right after diving deep into Garden of Silence with the help of the Coachman, Miriam finds herself amidst a strange Tower where a vicious demon sleeps.
Up to the Towers
Head up the Tower where you'll encounter a Buer Armor demon, kill it for a chance of it to drop 1x Steel and continue forward. If you continue heading towards the east end on the same level, you'll find a chest with 1x Oak and 1x MP Max Up above it. Head back where the metal platforms are and instead of heading up, take a detour first and jump down to the very bottom to find another chest with 1x Hair Apparent VI. Once you've collected the item, head back up to where the Buer Armor is by using the unstable platforms and continue going east towards inside the Tower. - just before entering the room, there is a chest outside where you can reach it by riding the moving gear and by jumping across where the chest is.
Inside the Tower
Once you're inside, you'll encounter 1x Celaeno flying in the air. After killing it, head up by jumping onto the metal platform where you can find a chest with 1x Hemp to your right.
Proceed to your left where you'll stumble upon a bookshelf and a unique mechanism, read the journal from the bookshelf to check a guide that mentions that Miriam can move certain doors and mechanisms by holding out her hand in front of it. To do this, stand in front of the mechanism and tilt the right analog stick to the direction you want it to move. And by doing that, you can turn the gear and adjust it to a level where you can jump on it to head to the next room at the top.
After reaching the top room, 3x Poltergeist will start to attack you, clear out the demons and go east for now. There will be a chest with 1x Hyperventilator inside it and another path for you to go to. Continue moving east and you'll find another chest with 1x Partisan, collect the weapon and head back to the area where you fought the Poltergeists and this time, head to the other end of the room. - Take note, that in that same room, there is a metal platform for you to jump on that leads to another room. But since it is too high, you will have to acquire a certain Shard in order to reach it. For now, just head west from the same room and we will mention later on when you can return to that spot.
Alfred Intervenes
As soon as you walk into the room, you'll find Gebel and Gremory at the other end of the room - an exchange of dialogues will then start. Gebel tries to persuade Miriam by complimenting her and praises her for collecting all the different shards of the demons and controlling them. Miriam then stands her ground and mentions that it is only power and nothing more else, and if she can fully control them, she considers herself to be a human being. And just before the tension rises, a projectile shoots out of nowhere towards Gebel and Alfred intervenes. Aggravated, Gebel attacks Alfred and the two face off for a brief moment, right before Alfred attacks, Gremory advises Gebel to retreat and conserve his energy for King Bael. Gebel agrees, and the two retreats from the scene. Alfred then leaves and chases Gebel.
Onto Livre Ex Machina
Once you've regained control of Miriam, continue heading west that will take you to another room inside the Tower. You'll find a chest on your left that contains 1x Ether, collect it and head to the bottom and on to your right where you'll find a bookshelf with a journal for Miriam to learn Power Slash followed by a save room, while on the left-hand side, you'll find a door that will lead Miriam to the next location, Livre Ex Machina.
Video
[video goes here]
Map

Trivia & Notes:
Trivia and notes go here
General Information
- Previous: Livre Ex Machina
- Next: Bridge of Evil
- Bosses: Valac
Video Walkthrough
Map

NPCs in the area
- None
Bosses
Items
Materials & Consumables
- Wool
- 1x Steel
- 1x Ruby
- 2x Silver
- 1x Hemp
- 1x Ginger
- Mithridate
- Toad Heart
- 3x Emerald
- 2x Sapphire
- Sinister Eye
- 2x High Potion
Equipment & Upgrades
- 1x Sweets/R
- 1x Sunglasses
- 2x HP Max Up
- 2x MP Max Up
- 1x Capacity Up
- 1x Invisible Blade
- 1x Carnot's Rebuke
- Inferno Breath (Shard)
- 1x Special Ammunition/R
Key Items
- 1x Passplate
- 1x Identification
- 1x Silver Bromide
Enemies
Towers of Twin Dragons (Revisited) Walkthrough
With a new ability to traverse the castle has been acquired, Miriam returns to the Towers of Twin Dragons where she faces a ferocious demon.
Back to the Towers
After defeating Andrealphus at Livre Ex Machina and obtaining a new traversal ability, make your way back to the Towers of Twin Dragons, you can use the fast travel that is located near Andrealphus' arena and follow the path through the Garden of Silence that leads to the entrance of the Towers.
Now, head up the same path that will lead you inside the Tower, but before you do so, make sure you check the west side of the Towers where you'll encounter 1x Wolfman and 2x Flying Morte, kill the demons blocking your path and run towards the end where you can acquire 1x HP Max Up. Once that's done, you can head over the path going inside the Tower, just don't forget to open the chest containing 1x Sunglasses that's right before the entrance of the inside of the Tower.
Going Up?
You've retraced your steps and now your back inside the Tower, a Celaeno will be inside the room, so kill it before you head up to open the chest containing 1x Steel, 1x Hemp, 1x Ginger, and before moving to the next room. As mentioned in the starting point of this walkthrough, the goal now is to return to the room that has a high platform where 3x Poltergeist is, and once you're back in that room, simply avoid the demons or kill it, then proceed to the top.
You'll now find yourself inside a gear room with Dullahamer Heads flying around. Run towards the left-hand side and use the gear to reach the huge gear in the middle, you'll have to get in between its teeth and crouch while it moves to avoid the spikes on the ceiling. Once you're through, continue to the next area where you'll now be back outside of the Towers at a higher level.
After going back out, you'll see a chest right below you along with a pesky little Poison Toad. Head down to kill the toad and open the chest to acquire 1x Ruby and 1x Sapphire. Afterward, continue heading east where you'll encounter another Wolfman. Now, use the gear that is moving vertically and jump onto the gears to reach another level of the Tower. A Buer Armor along with a Poison Toad is waiting along the path, kill it and continue moving east until you reach another dead end where a chest can be found that has 1x Emerald, 1x Sapphire, and 1x Silver in it.
Once you've obtained the items in the chest, jump down and continue moving east. Be mindful of the Poison Toads and kill it quickly since it inflicts poison upon hit. Continue moving east until you stumble across an unstable platform and more gears.
Now, instead of trying to reach for the platforms on the east side to get to the top, drop down and land on the lower gears first so that you can acquire an upgrade that's sitting at the end of the path. Continue running to the right-hand side of the Tower where you'll encounter 1x Wolfman along with 2x Flying Morte (may drop a Mithridate), kill it so you can pass to acquire 1x HP Max Up.
Now, head back to the gears and this time head west where you can reach the unstable platforms, continue heading west and slide under the big gear to reach a chest containing 1x Sweets Recipe.
Jump on the gear and look to your top left where you can obtain 1x MP Max Up. After acquiring the upgrade, head towards the path where the gears are and use it as a platform to reach another area that leads to the inside of the Tower, just make sure you jump all the way until the end where you'll find another chest with 1x Carnot's Rebuke inside.
Back Inside the Towers
Once you're inside, Dullahamer Heads and a 2x Celaeno (one at the bottom, and one at the top) will attack you. Kill the Celaeno alone, avoid the Dullahamer Heads and jump onto the gears where you'll find yet another chest at your right that has 1x Emerald and 1x Silver. Jump over the gears to get across and before heading up, walk towards the wall and hit it with your weapon to reveal a hidden wall containing 1x MP Max Up, acquire the upgrade and proceed to the top.
Now you've reached a new area, first, head to the room to your left to discover a fast travel room for you to use and unlock and proceed further east once that's done. A Poltergeist will be waiting and a Shield Outsider along the way. Continue moving east towards a corridor with a chest containing 1x Special Ammunition recipe and another area that has a lever that controls the lift. Pull it for its doors to open and for you to pass through the other side.
As you continue going east, you will come across another chest containing 1x Emerald right before entering another room with 3x Poltergeist. From here, continue moving east that will bring you to a dead end where you can acquire 100G inside a chest. Open it and head drop down from the silver platform that will bring you to another room.
You'll find yourself inside another gear room where you'll have to make your way down to reach the next area. Before doing that, drop down to the right-hand side of the room and approach the wall. Strike it with your weapon to reveal it to be a breakable wall that has 1x Invisible Blade.
You can also find another chest that has 1x High Potion at the other end of the room, across the gears. Once that's done, you can go ahead and proceed to the next room, by heading to the bottom - be mindful of the constant Dullahamer Heads flying inside the room and spikes on the ground.
Now, you've reached yet another area with 2x Celaeno from the bottom of the gear room. At the eastern end, you'll find a save room for you to use, while the western side leads to a path with a lift that you can use to reach other levels of the Towers. You can explore the area more, but our main path is to drop down the silver platform near the save room - REMINDER: be sure to save your game before dropping down to the next area.
Boss Battle, Twin Dragons Valac
Once you're ready, head down the silver platform where you'll find 1x Shield Outsider and a chest containing 1x High Potion - continue down the path until you reach the glowing red door that indicates a boss battle in the next area.
You'll find yourself back outside the Towers, which is the arena for a boss battle. As you continue forward, the Towers will start to shake, only to reveal the Twin Dragons Valac. You can visit the Bosses page to learn more about strategies on how to defeat this boss. Upon defeat, players will unlock the "Snake Charmer" Trophy/Achievement and in conjunction, Miriam acquires the Inferno Breath shard.
Now, jump back onto the path where you'll find a golden chest with 1x Silver Bromide which is the item Dominique needs for her camera to work. You can also find 1x Capacity Up hidden behind the rubble below the chest. From the hole on the ground, head west where you'll find a lift. Ride it all the way to the top and head west towards the fast travel room and head back to Arvantville.
Acquiring your Credentials
Once you're back in the village, speak to Dominique and show her the material you've acquired. An exchange of dialogue will follow and Dominique will take a photo of Miriam, allowing her to acquire 1x Identification. Now, fast travel to Livre Ex Machina and speak to Orlok Dracule to acquire your credentials (1x Passplate). With the Passplate in hand, you can now head towards your next location, the Bridge of Evil.
Video
[video goes here]
Map

Trivia & Notes:
Trivia and notes go here
 Anonymous
 Anonymous
Soon.. There's a room below the save room in the twin dragon area with a guy with the rotating shield.. And in this room under the floor is a green chest. How the feck does one obtain said chest?


Holy*****yes! How?!
0
+10
-1